


Staggered GridView In Flutter
A grid view is a graphical control component used to show things in the tabular structure. GridView is a widget in Flutter that shows the things in a 2-D array (two-dimensional rows and columns). As the name proposes, it will be utilized
How to create Splash Screens in Flutter
Flutter Splash Demo was created to understand how we can create different types of Splash Screens both for Android and iOS. As most of iOS developers would agree that creating iOS Splash screens can be a bit of a hassle due
Creating a Flutter Plugin for Android and iOS | Image Gallery
What is Flutter plugin? Flutter plugin is the wrapper of the native code like android( Kotlin or java) and iOS(swift or objective c). MethodChannel is used to communicate the native code of Android and iOS to flutter (dart code). This is the basic understanding
Know Your Widgets: Row and Column
So, the next widget in our series is not just a single widget, in fact, we would be covering two different widgets in this blog, namely Row and Column. The reason behind integrating two widgets together is the fact these
Data Persistence with SQLite | Flutter
Whenever you need to store the data on the local then you need to use SQLite to persist the user data.
Why Data Persistence?
Persisting data is important for users since it would be inconvenient for them to type their information every time or wait for the network to load the same data again. In situations like this, it would be better to save their data locally.
Why we use SQLite?
SQLite is a popular choice as embedded database software for local/client storage in application software such as web browsers.
How to use SQLite in a flutter?
Before using SQLite, you should know that
SQLite is not available in a flutter SDK as Android but we have a plugin sqflite that exactly performs all the operation on the database just like in Android and iOS.
Flutter plugin is the wrapper of the native code written in Kotlin or java for Android and swift or objective-c for iOS. P.S : Plugin can also be created only with dart code
If you are new to SQLite, go through SQLite Tutorial site here.
Implementation
Step 1: Add the dependencies
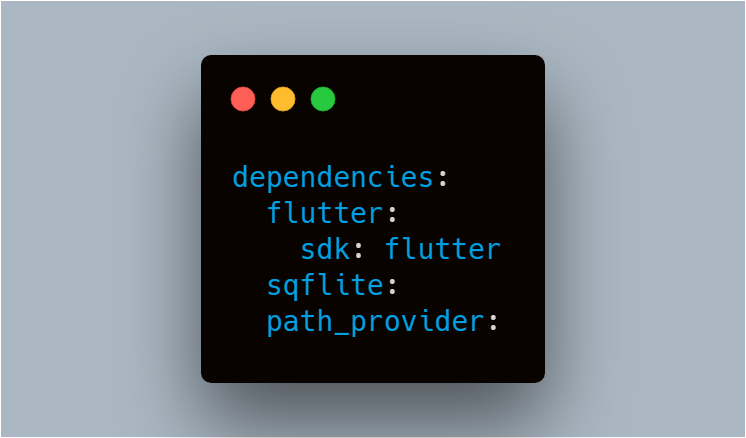
To work with SQLite databases, import the sqflite and path packages
sqflite package provides classes and functions that allow you to interact with a SQLite database.
2. The path_provider package provides functions that allow you to correctly define the location to store the database on disk such as TemporaryDirectory and ApplicationDocumentsDirectory.
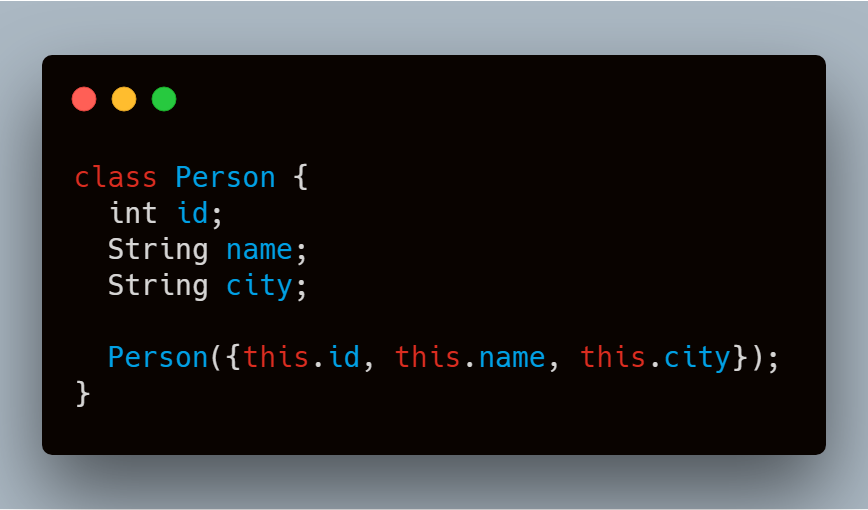
Step 2: Create a Model class
SQLite creates a table for the model class, the fields in the class correspond to columns in the table. Therefore, the classes tend to be small model classes that don’t contain any logic. Our Person class represents the model for the data in the database.
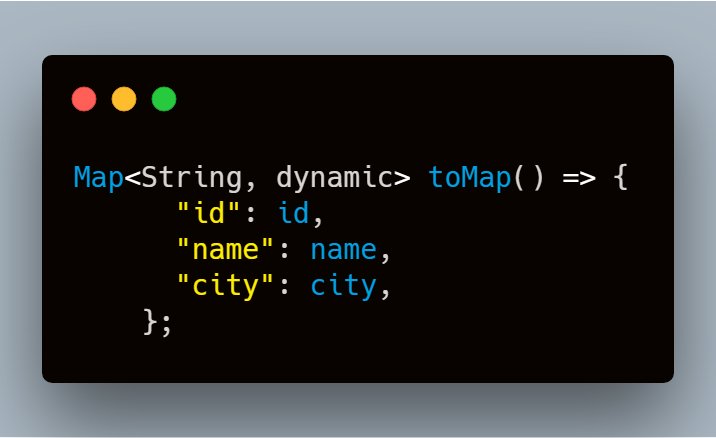
If we want to insert into the database then we need to convert the Person into a Map
And if we want to retrieve from the database then we need to convert the Map into the Person
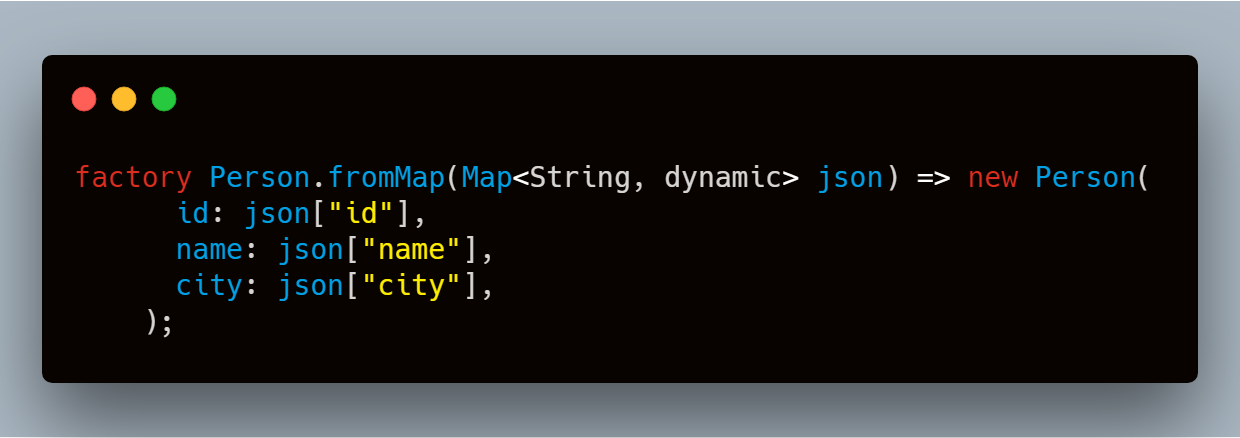
This is how our PODO class will look like
Step 3: Create a database
We will make a separate class as database.dart to make the code more modular and add all the requirements meths for managing the database that can be accessed anywhere in the app.
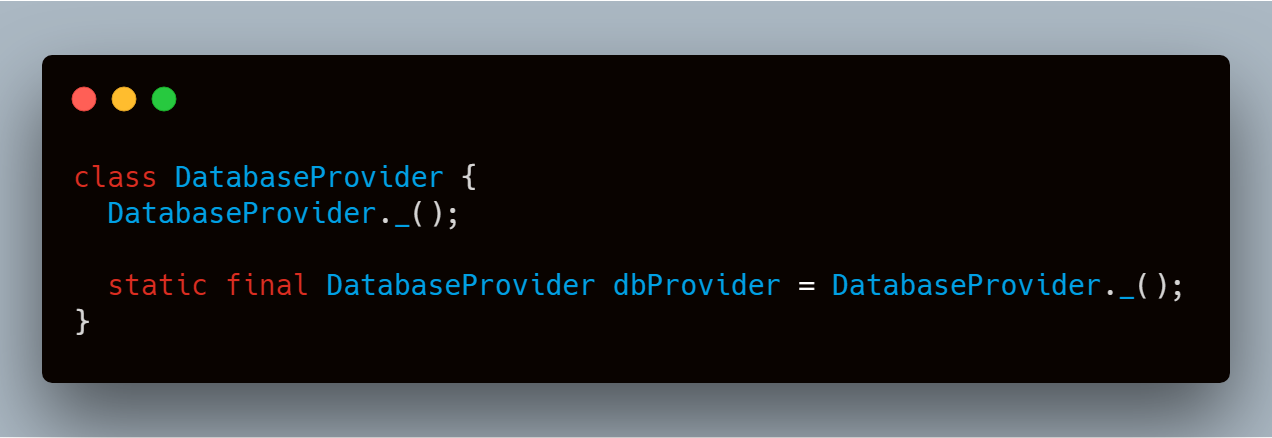
Create a singleton class DatabaseProvider
Why Singleton? We use the singleton pattern to ensure that we have only one class instance and provide global point access to it.
How to create a Singleton in Dart? Create a private constructor that can be used only inside the class.
Step 4: Open the Database
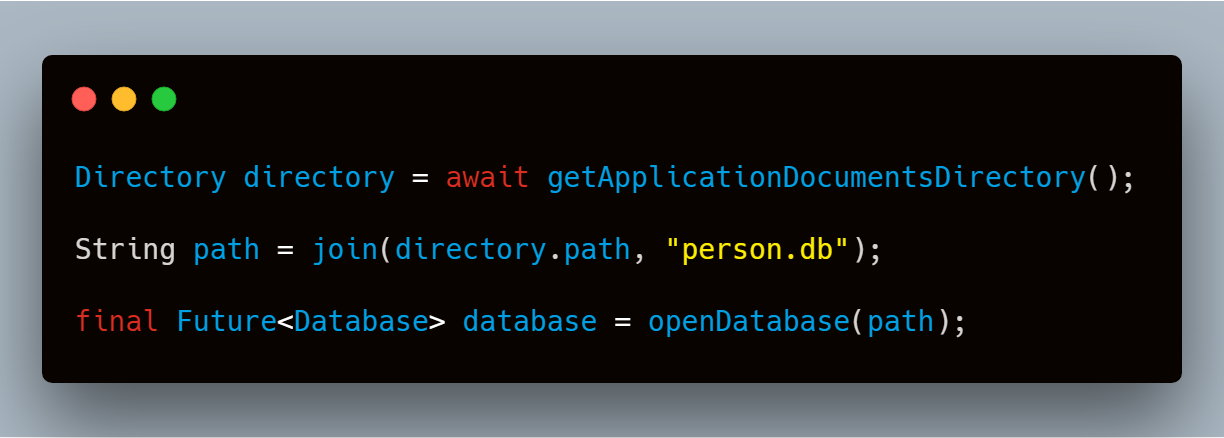
Before you read and write data to the database, you need to open a connection to the database. This involves two steps:
1. Define the path to the database file using thegetDatabasesPath from the sqflite package combined with the pathfunction from the path package
2. Open the database with the openDatabase function from sqflite
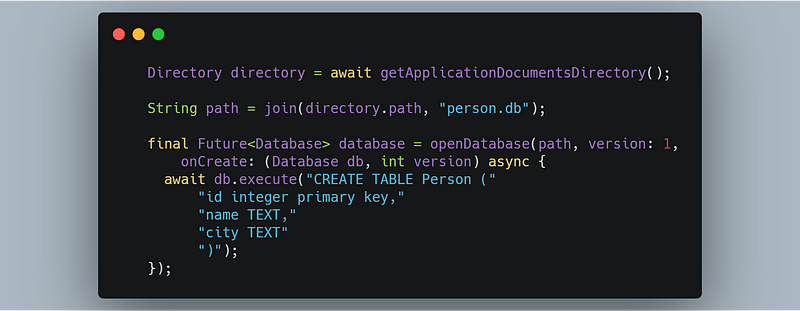
Step 5: Create the table
You need to create a table to store information.
For example, In our case, we create a table called Person that defines the data that can be stored. In this case, each Person contains an id, name, and city. Therefore, these will be represented as three columns in the Person table.
id is a Dart int, and will be stored as an INTEGER SQLite Datatype. It is also good practice to use an id as the primary key for the table to improve query and update times.
2. The name is a Dart String, and will be stored as a TEXT SQLite Datatype
3. The city is also a Dart String, and will be stored as an TEXT Datatype
To prevent from opening a connection to the database again and again we can use this:
Step 6: Managing the data
Now we are going to show you how you can perform an operation on the SQLite database.
Query:
getAllPersons() will return all the person from the SQLite database if available.
Insert:
Delete:
If you see we have two methods, one deletes the row with particular id and other deletes all data present in the table, you can change all the query according to your need.
Update:
If these small code snippets still confuse you we have the complete code of the database class:
Step 7: Using the data
In order to use the database we need to create the instance of the database and use the method present in the database class
DatabaseProvider.db
This will help us to perform an operation on the database.
like if we want to get the person in the database we will use the method that we have defined in our DatabaseProvider class
DatabaseProvider.db.getAllPersons()
And if I want to display it in the list then I’ll use FututeBuilder :
Google Maps in Flutter
Google Maps, we all are quite aware of the fact of how crucial Maps are in our life, from locating a place to locating nearby shops, in our daily commute, taxi, food deliveries. The first thing to observe is how
Managing the state of a Widget using bloc | Flutter
It’s very hectic to manage state in flutter it when we have a complex UI and complex widget tree. Before we jump into the state handling using bloc you need to understand about state management. Why we need State management Whenever we perform
Using SharedPreferences in Flutter
What is SharedPreferences
SharedPreferences is used for storing data key-value pair in the Android and iOS.
SharedPreferences in flutter uses NSUserDefaults on iOS and SharedPreferences on Android, providing a persistent store for simple data.
Why use SharedPreferences in Flutter?
Suppose you wanna save a small value (a flag probably) that you wanna refer later sometime when a user launches the application. Then shared preference comes into action.
We do not use SQLite for saving small values because then you will need to write lengthy codes and supporting classes.
Shared Preference let you read and write key-value pair in a couple of lines easily. But always remember, shared preference is not a solution for you to keep complex relational data.
How to use SharedPreferences in Flutter?
Before using SharedPreferences, you should know that Flutter SDK does not have support SharedPreferences but fortunately, the shared_preferences plugin can be used to persist key-value data on disk.
Implementation
Step 1: Add the dependencies
Add dependencies to pubspec.yaml file.
dependencies:
  flutter:
    sdk: flutter
  shared_preferences: "<newest version>"
Step 2: Import shared_preferences.dart
import 'package:shared_preferences/shared_preferences.dart';Step 3: Save data
We can only add int, String, double and bool using SharedPreferences.
There are setter methods in the SharedPreferences class which take two parameters, key and value.
Note : keys are only string values
Saving String value
Saving int value
Saving double value
Saving boolean value
Step 4: Read data
When we are reading the data from the storage through SharedPreferences we only required to pass the key only.
If the value is not present in the storage then we might get a null value. To handle this we can use
intintValue= prefs.getInt('intValue') ?? 0;
Step 5: Remove data
To remove the data from the storage we provide the key in the remove(String key) method.
Check value if present or not?
SharedPreferences prefs = await SharedPreferences.getInstance();bool CheckValue = prefs.containsKey('value');
containsKey will return true if persistent storage contains the given key and false if not.
BLoC pattern in Flutter
By the title, you must have got an idea about what this article will be. As Flutter is growing day by day and so it’s developers and we as a developer always look for an easy way to deal with